Plastic injection molding is a technique that combines complex design work with precision production on a large scale to swiftly make many, many highly detailed plastic pieces. The injection molding process efficiently completes this work, but even the greatest process occasionally encounters problems, mistakes and faults. Good news is that there are some experienced plastic injection molding manufacturers like GEMS who are skillful and committed to conduct continuous improvement. To achieve that purpose, they have studied the best techniques to prevent the most typical injection molding defects at various phases of the injection molding process. By concentrating on those issues, the production team can work proactively to reduce the possibility of faults and assure that their customers’ products are built with the expected precision and quality.

1. Flow Lines
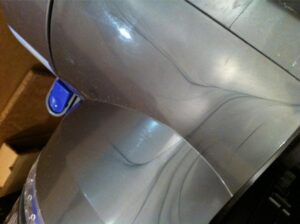
Flow lines typically emerge on thinner portions of the molded component as a wavy pattern, which is frequently a little different color than the surrounding area. They could also take the form of ring-shaped bands close to the “gates” where the molten material enters the mold on the surface of the product. Flow lines normally have no effect on the component’s integrity. However, if they are present in particular consumer goods, like high-end eyewear, they can be ugly and possibly unacceptable.
Causes
- The cooling speed of the material as it flows in different directions throughout the mold
- Differences in wall thickness can also cause the material to cool at different rates
- Injection speed and/or pressure are too low
- Low mold temperature and material temperature
- The small size of the gate and flow channel
Solutions
- Increase the injection pressure, speed, and material temperature.
- Add some more distance between the mold gates and the mold coolants.
- Increase nozzle diameter.
- Switch to a hot runner or reduce the size of the main channel
2. Sink marks
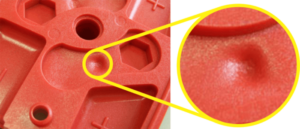
Sink marks are minor depressions or recesses in a molded part whose surface is supposed to be flat and uniform. This type of plastic injection molding defect can happen when there is a shrinking to a molded component’s inside part, drawing material to inward from the exterior.
Causes
- The molten plastic material cools too slowly in the mold
- The thickest parts of the mold due to uneven cooling of the plastic material
- Improper structural design of the intended molded component
Solutions
- Increase holding pressure and time
- Increase cooling time to limit shrinkage
- Reduce the component thick wall size
3. Weld Lines
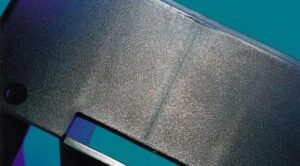
Weld lines may happen on the surface of a plastic molded component when the molten material was converged in a mold. As known to all, the molten material was injected and split into two or more directions. Such weak material bonding results in the hair-like weld line, which reduce the part’s impact strength and becomes the area easily breaks in functional testing.
Causes
- One direction of material cools faster than the other to form an inadequate bond.
- The molten material wasn’t maintained a certain temperature or long enough when colliding.
- Uneven wall thickness, inserts, holes, and multi-gate features on molded parts
Solutions
- Increase material melting temperature to prevent partial solidification
- Raise injection speed and pressure to limit cooling before the material has filled the mold
- Adjust the position of the gate and include a venting slot.
- Switch to a material with a lower melting temperature or viscosity
4. Wrapping
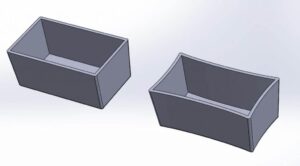
Wrapping appears to the plastic molding product, which is a type of deformation, when different portions of a molded part shrink unevenly. Plastic and other materials can warp during the cooling process when unequal shrinkage places undue stress on various sections of the molded object, similar to how wood can warp when it dries unevenly. The final part bends or twists as it cools because of the excessive stress. This is noticeable by a part that, despite being designed to lie flat, creates a gap when placed on a flat surface.
Causes
- A product cools and solidifies unevenly during plastics processing
- Cooling happens too quickly, while excessive temperature or low thermal conductivity of the molten material wasn’t released.
- The walls of the mold are not of uniform thickness—shrinkage increases with wall thickness.
Solutions
- Make the cooling process gradual and long
- Adjust the mould temperature during mass production.
- Use materials that do not shrink excessively during cooling.
- Ensure that the mold with uniform wall thickness and part symmetry
5. Short Shot
When molten material flows through a mold but doesn’t entirely fill the voids, a short shot happens to the molded part. As a result, after cooling, the molded component is incomplete. Short shot could show up as, for instance, missing prongs on a plastic fork or unfinished sections in plastic display shelves. Short shots are frequently regarded as a serious flaw to a plastic molding part, as it can change the molded part’s function or appearance to the intended design specification.

Causes
- Flow restriction due to narrow or blocked gates
- The Material with very high viscosity
- The mold is too cold to allow the molten material to completely fill the mold before cooling
- Trapped air pockets hinder proper flow
- Injection pressure is inadequate
Solutions
- Redesign the mold with wider gates or channels for better flow.
- Increase injection speed or pressure
- Choose a thinner base material
- Increase mold temperature to prevent rapid cooling of the material.
- Add more air vents or enlarge existing vents.
6. Discoloration
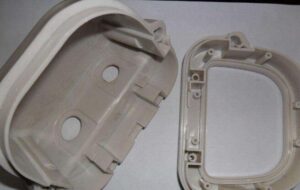
Discoloration, also known as color streaking, happens when a plastic product is not molded with the intended color. It is more often that the discoloration only affects a small patch or a few streaks of unusual color to the molding component’s surface. This flaw will impact the appearance of the end product but no impact to its strength or functionality.
Causes
- Leftover pellets in the hopper
- Residual resin in the nozzle or mold from a previous production run
- Poor thermal stability of the coloring agent
- Improper mixing of the master batch
Solutions
- Properly clean the hopper, mold, and nozzle between production processes.
- To use a purging compound to eliminate excess color from the machine
- Ensure the master batch is evenly mixed.
- Ensure the thermal stability of color agent
7. Flash
Flash, an excess of molding material, is sometimes known as “spew” or “burrs,” is visible as a small flap of thin extra plastic material at the edge of a component. Flash is a result of material flowing into areas other than the designated flow pathways, such as the area at the injector pin or between the tooling plates. The flaw of injection molding Flash is usually not a serious issue unless it affects the appearance of the finished product, which can be regarded as a major defect. Trimming the extra material is a common step in the process of reworking a flash-molded product.

Causes
- Defects in the molding material
- Insufficient clamping force
- Improper exhaust system design and management
Solutions
- Design the mold such that it enables closing when required.
- Ensure that the exhaust port comes at a suitable size.
- Redesign or retool the mold for proper flow of material.
- Increase the clamping force of the plate.
Conclusion
Plastic parts can be produced using injection molding, which is a very effective manufacturing process. However, as you can imagine, generating high quality end-parts requires close attention to details and a proactive risk management strategy. Choosing a manufacturing partner like GEMS, who is knowledgeable about typical Plastic injection molding defects and their capabilities of troubleshooting, is one of the best option to supply high quality parts produced on schedule and within budget. We are an on-demand manufacturing company with rich experience and flexible operation, but we also offer design consulting and optimization services to assist our clients in producing good-looking and high-performance components as efficiently as possible.